Rabu, 29 Juli 2020

cara mengatasi instal ulang node red yang GAGAL di windows


awal mula dari share artikel ini beraawal dari pengalaman saya yang mau instal ulang Node red yang mana akan melakukan upgrade dari versi lama ke versi baru.

pertama saya download dulu node js versi terbaru. kemudian di instal sampai finish. setelah itu instal node red via cmd. muncullah seperti gambar dibawah ini

akhirnya saya coba hapus folder node red d c/user/xxxxx/.node red
dan folder npm dan npm chace  c/user/xxxxx/appdata/roaming


alhamdulillah berhasil


sekian share pengalaman ini, semoga bermanfaat.


Senin, 13 Juli 2020

cara menambah board ESP32 di arduino IDE


berikut langkah-langkah menambah board esp32 di software Arduino IDE.
1. jalankan software arduino IDE, pilih file - > preference


2. masukkan url ini : https://dl.espressif.com/dl/package_esp32_index.json di dalam kolom  “Additional Board Manager URLs” . Kemudian klik “OK”

jika sudah ada board esp8266, kasih koma setelahnya. contoh seperti dibawah ini:
https://dl.espressif.com/dl/package_esp32_index.json, http://arduino.esp8266.com/stable/package_esp8266com_index.json

3. klik tools -> board -> board manager

4. ketik esp32 dikolom, kemudian instal


finish


catatan buat esp32 
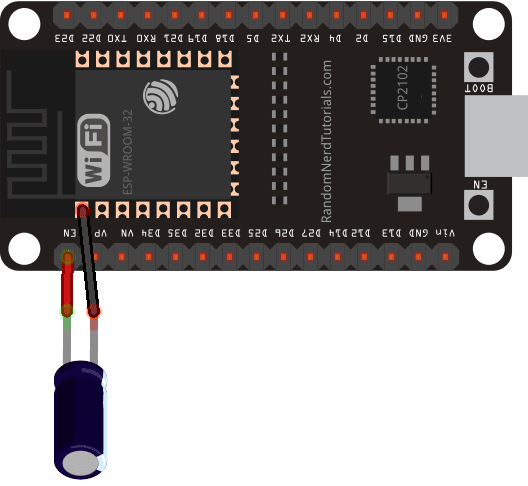
saat upload sketch muncul pesan error : “A fatal error occurred: Failed to connect to ESP32: Timed out… Connecting…“.
itu artinya esp32 tidak pada mode flashing / uploading

caranya biar gk error ada 2 cara :
1.  tekan boot pada esp 32 saat uploading dan di software muncul connecting............


2. memasang kapasitor 10uf antara pin EN dan pin GND


selamat mencoba

Minggu, 12 Juli 2020

Node Red Dashboard HMI SIMOR


Node Red sebagai Dashboard HMI SIMOR

SIMOR membaca data dari 2 power meter yang berada di dalam panel. jarak dari panel ke control room sekitar 270 meter. berikut gambaran site di lapangan


dengan adanya SIMOR petugas tidak perlu catat parameter pengukuran ke lokasi tiap jam. cukup monitoring langsung dari control room dan data tersimpan di database server secara otomatis.


Minggu, 05 Juli 2020

instal Palette Node Red


cara instal palete ada 2 cara: 
1. klik pojok kanan atas di web browser saat buka 127.0.0.1:1880
pilih manage palete
tab instal
cari palete yg dinginkan
pilih instal


2. buka  windows explorer
masuk di C:\Users\xxxxx
tekan shift + klik kanan mouse disitu
pilih open command windows here


kemudian ketik palete yang mau di instal, lalu enter

tunggu sambil minum kopi


berikut yang wajib dimiliki seorang modbuser:

Dashboard : npm install node-red-dashboard
Modbus (serial & TCP) : npm install node-red-contrib-modbus
Media :  npm install node-red-contrib-ui-media


Kamis, 04 Juni 2020

apa yang perlu disiapkan sebelum training "MEMBUAT ALAT MONITORING ARUS LISTRIK RUMAH DARI HANDPHONE"?


pertama komponen :
-Nodemcu + kabel data
-Sensor arus Split core
-PCB 5x7cm
-Resistor 33ohm
-Resistor 10Kohm #2
-Resistor 330ohm
-Elco 10uF 16v
-Led
-Pin header female 1x40
-Kabel Jumper

kedua alat :
- laptop/pc
- kabel usb micro
- handphone

yang perlu di instal :
PC/laptop : sofrware arduino IDE, serta library (blynk, esp8266, emonlib, timelib)


*klik tulisan buat download

software yang d gunakan saat training zoom / google meet. silahkan di siapkan di laptop atau handphone masing".


Selasa, 02 Juni 2020

modul kontrol relay 1 channel esp8266


1 – The power input terminals.
2 – The relay output terminals.
3 – IO input terminal.
4 – Enter the status indicator, IO input high when lit, blue light.
5 – The relay output status indicator, the relay is turned on, the red light.
6 – TTL serial output.
7 – Boot mode selection jumper.

A: 7-30V+ DC power supply
B: Power supply ground
C: Normally closed (NC) relay contact
D: Common (COM) relay contact
E: Normally open (NO) relay contact
F: 5V+ out
G: ESP8266 GPIO5 Optocoupler Input
H: Ground (isolated optocoupler input)

scematic

script Blynk
/*************************************************************************
* Title: Simple ESP-8266 blynk/yunshan wifi relay control
* File: esp8266_yunshan_relay.ino
* Author: James Eli
* Date: 12/25/2016
*
* This program controls a Yunshan wifi relay module communicating through
* the onboard esp-8266-12e module. The module is controlled from the
* internet via the Blynk cloud app.
*
* Notes:
* (1) Requires the following arduino libraries:
* ESP8266
* Blynk
* (2) Compiled with arduino ide 1.6.12
* (3) Uses three Blynk app widgets:
* V0: button configured as a switch.
* V1: led.
* V2: led.
*************************************************************************
* Change Log:
* 12/25/2016: Initial release. JME
* 12/31/2016: Added input pin status. JME
* 01/15/2017: Added volatile. JME
*************************************************************************/
#include <ESP8266WiFi.h>
#include <BlynkSimpleEsp8266.h>

// Esp8266 pins.
#define ESP8266_GPIO2 2 // Blue LED.
#define ESP8266_GPIO4 4 // Relay control.
#define ESP8266_GPIO5 5 // Optocoupler input.
#define LED_PIN ESP8266_GPIO2
// Blynk app authentication code.
char auth[] = "***";
// Wifi SSID.
const char ssid[] = "***";
// Wifi password.
const char password[] = "***";
// Flag for sync on re-connection.
bool isFirstConnect = true;
volatile int relayState = LOW; // Blynk app pushbutton status.
volatile int inputState = LOW; // Input pin state.

void setup() {
pinMode( ESP8266_GPIO4, OUTPUT ); // Relay control pin.
pinMode( ESP8266_GPIO5, INPUT_PULLUP ); // Input pin.
pinMode( LED_PIN, OUTPUT ); // ESP8266 module blue LED.
digitalWrite( LED_PIN, LOW ); // Turn on LED.
Blynk.begin( auth, ssid, password ); // Initiate Blynk conection.
digitalWrite( LED_PIN, HIGH ); // Turn off LED.
}

// This function runs every time Blynk connection is established.
BLYNK_CONNECTED() {
if ( isFirstConnect ) {
Blynk.syncAll();
isFirstConnect = false;
}
}

// Sync input LED.
BLYNK_READ( V2 ) {
CheckInput();
}

// Blynk app relay command.
BLYNK_WRITE( V0 ) {
if ( param.asInt() != relayState ) {
relayState = !relayState; // Toggle state.
digitalWrite( ESP8266_GPIO4, relayState ); // Relay control pin.
Blynk.virtualWrite( V1, relayState*255 ); // Set Blynk app LED.
}
}

// Debounce input pin.
int DebouncePin( void ) {
// Read input pin.
if ( digitalRead( ESP8266_GPIO5 ) == HIGH ) {
// Debounce input.
delay( 25 );
if ( digitalRead( ESP8266_GPIO5 ) == HIGH )
return HIGH;
}
return LOW;
}

// Set LED based upon state of input pin.
void CheckInput( void ) {
if ( DebouncePin() != inputState ) {
Blynk.virtualWrite( V2, inputState*255 );
inputState = !inputState;
}
}

// Main program loop.
void loop() {
Blynk.run();
CheckInput();
//yield(); //Updated: 3/8/2017
}

cara blok value di Node red

 ambil node filter dan edit seperti di bawah ini