link Zoom akan dishare grup wa modbus arduino, ngombe dan grup FB Modbus arduino
Kamis, 31 Desember 2020
Selasa, 15 Desember 2020
emulator android yang cocok buat jalankan aplikasi IoT Blynk
sebelum download cek dulu spesifikasi PC yang diminta
Minimum System Requirements:
- 2 cores x86/x86_64 Processor (Intel or AMD CPU)
- WinXP SP3 / Win7 / Win8 / Win10 (Not recommended to run on Server/Enterprise)
- Latest Windows DirectX 11 / Graphics driver with OpenGL 2.0
- Hardware Virtualization Technology (Intel VT-x/AMD-V) shall be enabled in BIOS
- 2GB of RAM (4GB for x64 system)
- 5GB of hard disk free space
MEmu can run under the minimum requirements. However, please refer to the recommended specification for the best gaming performance.
Recommended Specification:
- OS: Microsoft Windows 10 with VT Enabled
- CPU: Single Thread PassMark score > 1500 (Intel/AMD Multi-Core). Click on this link to find the single thread Passmark score of your CPU.
- Graphics: Intel/Nvidia/ATI, Onboard or Discrete controller with PassMark score > 750. Click on this link to find the Passmark score of your Video Card.
- Latest Windows DirectX 11 / Graphics driver with OpenGL 4.5 or higher
- RAM: 8GB or higher
- HDD: SSD, 10GB of hard disk free space
- Internet: Broadband connection with low latency for FPS games
Note:
Higher Android version requires more RAM and Disk Space.
Higher end games installed on MEmu will require more RAM and Disk Space.
It’s not recommended to run MEmu Play in another virtual machine software.
It’s worthy to update the graphics driver or switch graphic card if has compatibility issue.
stelah instal. login akun gmail agar bisa download aplikasi di playstore
contoh hasil monitor blynk via PC
Minggu, 29 November 2020
node JS support windows 7
bagi yang kesulitan instal node js yang di windows 7.
karena di web node js yang terbaru hanya support windows 10.
bisa pakai yang versi lama
versi 12.8.3
Kamis, 26 November 2020
Kamis, 19 November 2020
WORKSHOP ONLINE #8 MODBUS & MQTT (MIKROKONTROLLER ARDUINO, STM32, ESP32 - KOMUNIKASI LORA, RS485, WIFI)
Selasa, 17 November 2020
Kamis, 12 November 2020
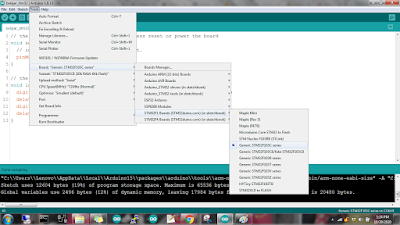
ARDUINO IDE tiba-tiba error ketika mainan STM32
kondisi sebelumnya normal, tiba-tiba. koding yang dipakai sebelumnya saat di compile muncul pesan error saat di compile.
pesan error :
exec: "/bin/arm-none-eabi-g++": file does not exist
Error compiling for board Generic STM32F103C series.
Rabu, 04 November 2020
Jadwal NGOMBE dan Workshop Online ke 7
Selasa, 03 November 2020
Sabtu, 31 Oktober 2020
Kamis, 29 Oktober 2020
perlahan mulai hijrah ke STM32
- usb to ttl
- kabel jumper femala to female sebanyak 4
- stm32
- instal software arduino IDE. (download disini)
- jalankan software arduino. kemudian instal board Arduino SAM
- (Tools menu, pilih Boards manager, kemudian install the Arduino SAM boards (Cortex-M3) )
- Download zip STM32 (download disini)
- Unzip STM32 kemudian extract, lalu rename menjadi Arduino_STM32, kemudian copy Arduino_STM32 ke folder C:\Program Files (x86)\Arduino\hardware
- Restart software Arduino IDE,
- perhatikan posisi jumper di board STM32
- posisikan mode upload jumpernya.
- copy sketch dibawah ini:
// the setup function runs once when you press reset or power the boardvoid setup() {// initialize digital pin PB1 as an output.pinMode(PC13, OUTPUT);}// the loop function runs over and over again forevervoid loop() {digitalWrite(PC13, HIGH); // turn the LED on (HIGH is the voltage level)delay(1000); // wait for a seconddigitalWrite(PC13, LOW); // turn the LED off by making the voltage LOWdelay(1000); // wait for a second}
- pilih ke Tools dan geser ke bawah untuk menemukan seri Generic STM32F103C seperti yang ditunjukkan di bawah ini. Kemudian pastikan variannya adalah tipe 64kFlash, kecepatan CPU adalah 72MHz dan ubah metode upload ke Serial.
hubungkan USB to ttl ke PC/Laptop dan periksa port COM yang mana board FTDI terhubung menggunakan device manager. Kemudian, pilih nomor port yang sama di Tools-> Port
- black tidak ada pin 5V
Rabu, 28 Oktober 2020
Minggu, 25 Oktober 2020
Review Workshop Online #5
cara mendapatkan ID grup Telegram
berikut caranya: Kirim sebuah teks apa aja ke grup telegram. Masukkan bot telegram Anda ke grup tersebut Buka browser dan tulis https://api...

-
#define BLYNK_PRINT Serial #include <TimeLib.h> #include <ESP8266WiFi.h> #include <BlynkSimpleEsp8266.h> #include <Wi...
-
Pzem003 / pzem017 adalah modul monitoring arus, tegangan, daya, frequency, dan energy yang mempunyai protocol Modbus RTU dengan...
-
berikut caranya: Kirim sebuah teks apa aja ke grup telegram. Masukkan bot telegram Anda ke grup tersebut Buka browser dan tulis https://api...


